Printer setup
Required hardware
Fienta's POS interface is web-based so that you can use it on any desktop/laptop, mobile or tablet. In addition, you will need the following:
Brady BBP12 printer.
Special tear-off ticket blanks supplied by Fienta with appropriate dimensions. Both the tickets and the receipt are printed on the same blank.
Cash drawer and a card payment terminal.
Connecting the printer
Connecting the printer to a wifi router
Printing with the Brady BBP12 printer connected to a wifi router works only with Firefox and Safari browsers. Printing is not supported in Chrome, Edge, or Opera.
Setup and configuration
The printer and the POS computer must be on the same network. Possible setups:
The computer and printer are both connected to the same network device via Ethernet.
The printer is connected via Ethernet, and the computer/mobile device is connected to the same device's wifi.
On the printer's screen, the IP address is displayed at the top left, for example, "192.168.1.148". This address is usually static but might change if the router or printer is restarted.
To enable printing, enter the printer's IP address displayed on its screen into Fienta. To do this, click the menu dots on the POS order page and input the IP address under the wifi network printer option.
Connecting the printer to a computer via USB cable
When connected via USB, the printer works with all browsers but only on Windows operating systems.
Setup and configuration
Install the Brady BBP12 Printer Driver in Windows.
Create a custom paper size (70mm x 118mm):
Go to Control Panel > Devices and Printers.
Right-click on the printer and select Printer Properties.
Open Preferences or Advanced Settings and find Custom Paper Sizes or User-Defined Sizes.
Set the paper size to 70mm x 118mm, name it, and save it.
Configure the Brady BBP12 printer:
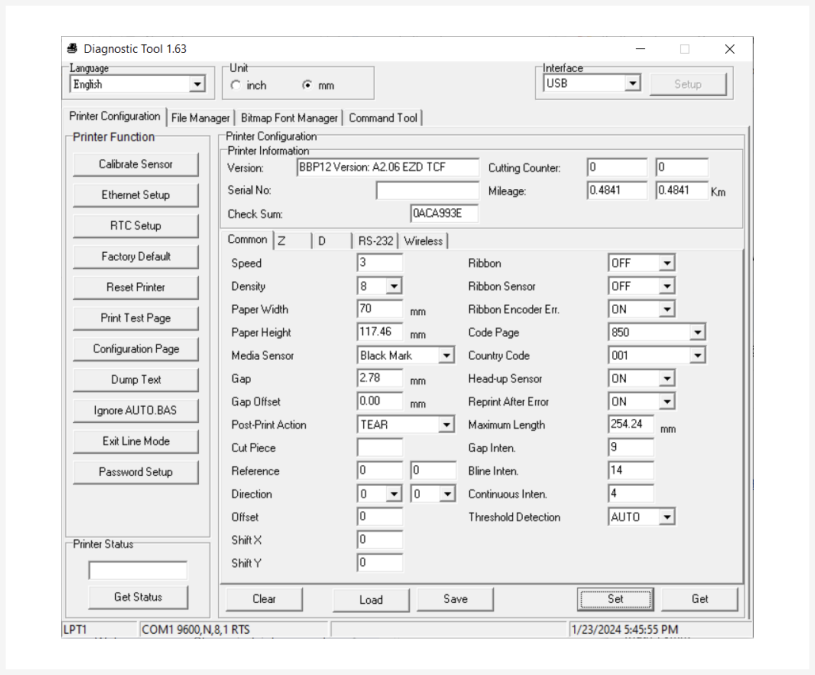
Download the diagnostic tool and reset the printer to factory default.
Apply the following settings:
Ribbon: OFF
Paper Width: 70mm
Paper Height: 118mm
Media Sensor: Black Mark

Open the POS order page in Fienta and select the printer as "Fienta ticket templates • USB printer" from the menu dots.
Setting up the printer
Install the required fonts into the printer's memory. You can download the font files and the necessary Windows application in this folder.
Open the top cover by pulling the grey tabs on each side toward the front of the printer.
Insert the paper roll, close the holders and lock with the switch on the left.
Move the sensor on the front to the left side to detect the slit between the ticket blanks.
Pull the first ticket blank out of the front of the printer and run the paper through the smaller black media guides.
Close the top cover. To do this, slightly push the green top cover support to the left to disengage it.
From the printer screen, select Menu > Sensor (with Select button) > Auto Calibration (Select) > Black mark (Down arrow, Select). After that, a couple of blank pages will come out of the printer, and the perforation should stop on the printer's front edge. If that doesn't work, reopen the cover. Reposition the sensor so it can detect the slit between the ticket blanks. Close the cover and recalibrate.
Changing the paper
To change the paper roll, open the printer's top cover by pulling the grey tabs on each side toward the front of the printer.
Pull the lock on the left holder up to move the green holders to the sides.
Change the roll, push the holders against the roll and lock again with the switch on the left.
Pull the first ticket blank out of the front of the printer and run the paper through the smaller black media guides.
Close the top cover. To do this, slightly push the green top cover support to the left to disengage it.
Press the Feed button on the printer. The first ticket blank should come out in full length so that the perforation is on the printer's front edge.
Solutions to potential problems
The printer prints, but the paper comes out partially or with the perforation in the wrong place
From the printer screen, select Menu > Sensor (with Select button) > Auto Calibration (Select) > Black mark (Down arrow, Select).After that, a couple of blank pages will come out of the printer, so the perforation should be on the printer's front edge. If that doesn't work, open the top cover. Move the sensor on the front left under the paper so it can read the slit between the ticket blanks. Close the top cover and recalibrate.
Paper comes out of the printer without printing
Check if you have inserted the paper roll into the printer the right way, so that the paper runs from top to bottom, not from bottom to top. In other words, make sure that the printing takes place on the outer, thermosensitive side of the roll.
I press the "Print" button in Fienta, but nothing comes out of the printer
Check if the IP address on the printer screen is the same as the one under in Fienta. If not, update the number in Fienta.
If you use your POS device via wifi, check if it is still on the same network as the printer. Sometimes the device may switch from one wifi network to another.
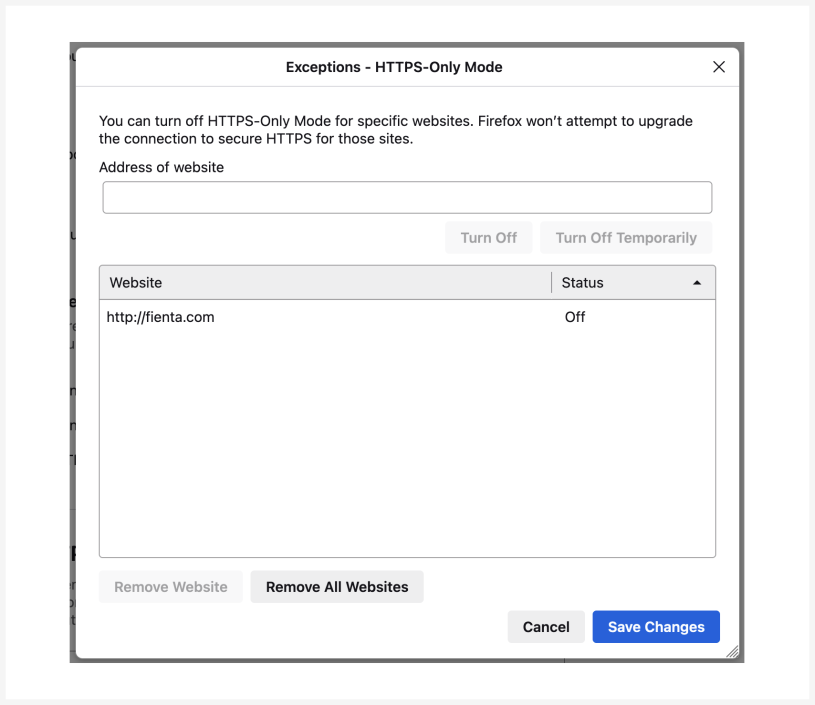
If you are using Firefox, you need to allow connections over HTTP. To do that:
Go to Firefox settings.
Click on "Privacy & Security" and scroll down to "HTTPS-Only Mode".
Click on "Manage Exceptions", add the domain "fienta.com", and click "Turn Off". This should be the result:

The IP addresses are the same, but still no printing
Restart the printer using the button on the back. Try again.
Still, nothing happens
Contact us and let's figure it out together!